Folding bikes are a great option for getting around town or for people short on space. As a result, their popularity has rocketed.
However, things aren't so rosy if you happen to get a rear-wheel puncture, because they use internal gear hubs. This means a slightly more complicated process to remove the rear wheel and you'll need to reset the gears when you reinstall the wheel.
In this guide, we'll take you through the steps you need to follow to fix a puncture on a Brompton (or any other bike with hub gears, for that matter).
Tools required
- Adjustable spanner
- Screwdriver
- 15mm spanner
- Tyre levers
- Track pump
- Puncture repair kit (optional)
- Hex keys
How to repair a puncture on a Brompton
One of the most popular hub-gear equipped bikes on the market is the Brompton, and although the steps below relate specifically to a Brompton, they can be applied to non-folding bikes equipped with a hub gear.
1. Tip the bike up
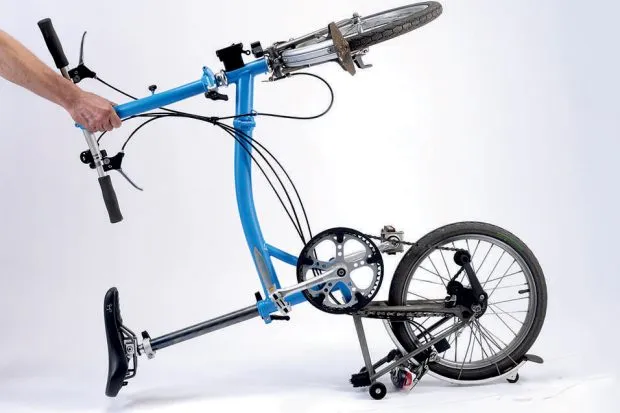
To start, make sure that you always carry a spare inner tube, adjustable spanner, patch kit, multi-tool and mini-pump on a ride. There's nothing worse than being caught out unprepared.
Working by the side of the road in the rain while the wheel is removed or installed can be a doubly daunting task. Fortunately, the folding design of the Brompton allows for a bit of clever positioning while fixing a puncture.
Having swung the rear wheel under the bike, drop the saddle down about halfway and then tip the other half of the bike backwards, bringing the back of the saddle to rest as pictured. Laying the bike down on its left side will do if there’s nowhere level enough to place the bike.
2. Remove the indicator
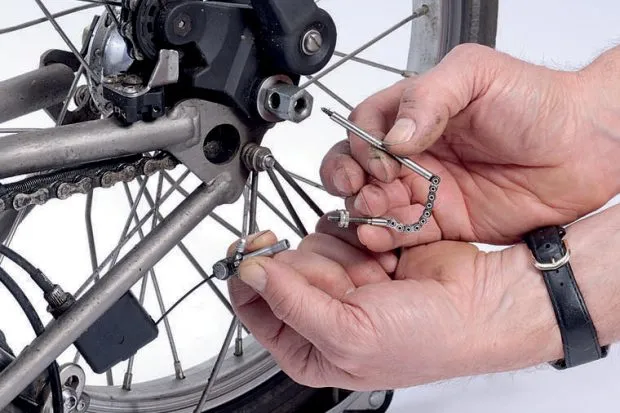
Both SRAM and Sturmey-Archer hub gears use a small shifter rod indicator chain for shifting duties. These are quite fragile, so treat with great care.
To prevent damage while removing the tension arm retaining nut, first shift into your highest gear to remove tension on the cable. Unwind the adjuster barrel, after having unlocked the adjuster lockring just a nudge.
Keep the lockring in its original position and use it as a quick adjustment reference when re-setting the gears. Now, carefully unwind the rod and withdraw it from the axle.
Having removed the indicator rod and chain, loosen the 15mm nut holding the tension arm. Note the light torque required for removal of the tension arm nut.
3. Remove the tension arm
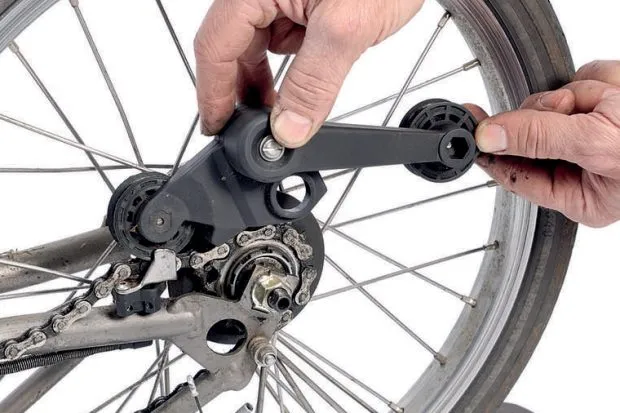
Note this step applies only to bikes with chain tensioners.
With the bike partially folded, the chain tension arm can be released fairly easily.
You can choose to first lift and drop the chain away from the crankset – this will give you plenty of slack with which to manipulate the arm.
You can also bring the two guide wheels together, which should enable you to slip the chain out from the lower guide pulley (that’ll be the one closest to you because the bike is upside down), making sure to hold on to it securely, otherwise it will fling open and could pinch a finger.
Make sure you route the chain correctly. It needs to route above the top pulley, which sits between the metal shifter fork, then around and below the lower spring-loaded pulley, which opens against the chain, keeping it tensioned.
4. Remove the wheel and fix the flat
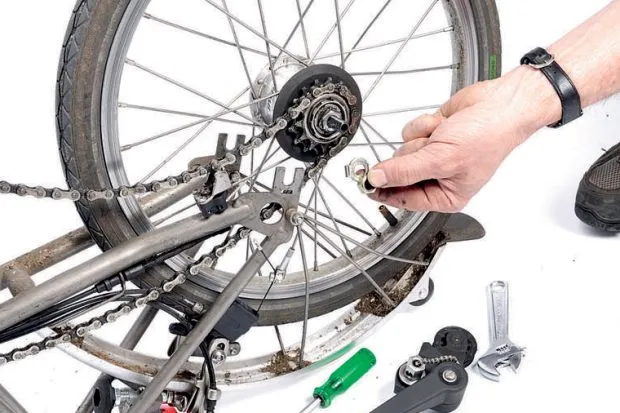
Now, you need to loosen the two 15mm axle nuts. Five-speed Bromptons (quite uncommon now) will have a further plastic indicator guide that needs to be removed.
Note the position of its retaining washer, paying particular attention to the placement of the anti-spin washers, which are gold-coloured on recent models and are marked with the word 'Top'. This bent tab needs to fit into the slot provided for it in the dropout and will help orientate the axle, which features two flats meant to slot into the dropouts.
Repairing the tyre ensures the rim strip is positioned correctly over the spoke nipples, with no damage around the valve hole.
Make sure you find and remove the cause of the puncture. Refer to step 8 for further tips.
5. Reverse order, adjust
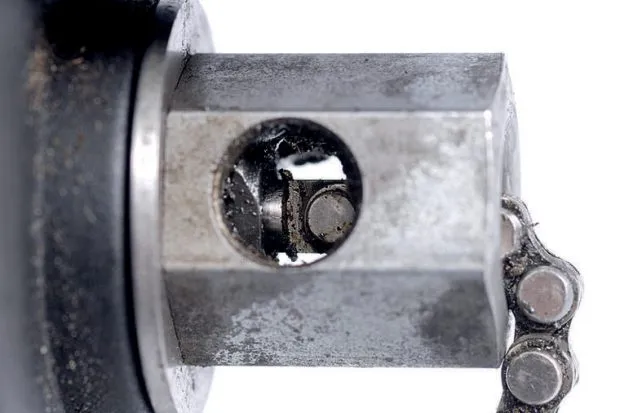
Next, re-install the wheel by reversing steps 2, 3 and 4.
With a three-speed Sturmey-Archer hub, set the shifter into second gear, then adjust the cable barrel until the square shoulder of the indicator rod is level with the edge of the axle (note: it’s set slightly too far in on the photo to better illustrate the shoulder).
With a five-speed hub, align the red (or blue) band on the rod level with the edge of the axle when in second. Test and re-lock the locknut.
With a SRAM/Sachs three-speed, once the indicator rod has been carefully screwed back in without forcing, slide the Clic Box back onto the indicator chain shaft, and set with a bit of slack in third gear. When the first gear is engaged, the indicator rod should pull out to its maximum travel limit exactly without forcing it.
Repairing a puncture on a Nexus or Alfine hub-gear bike
1. Remove the wheel
Using a 15mm spanner, loosen the axle nuts, noting how firmly they were done up.
Remove the torque arm retaining bolt if applicable. Pay attention to the order and orientation of the anti-spin washers, along with any other washer on the axle. Do not lose them.
2. Removing the cable carrier
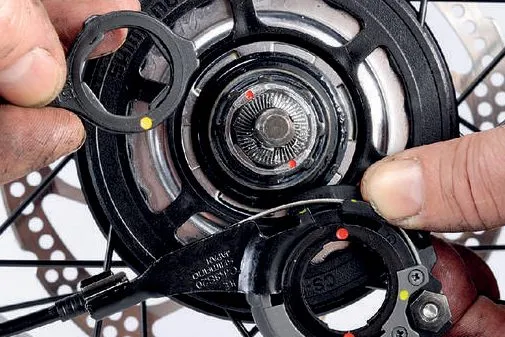
Remove the shifter plate assembly by turning the retaining plate with the yellow dots anti-clockwise, as pictured.
Rear roller brake torque arms on Nexus systems can make life even more challenging, so make sure you remove the retaining nut and bolt from the frame bracket first. It’s usually a 10mm nut with a 6mm thread.
Some frames also incorporate a shifter cable guide stop on the driveside chainstay. This means you’ll have to unload cable tension in the shifter plate in order to slip the cable out of the guide slot.
With a Nexus hub, place the shifter into first gear, which will release the tension from the cable, allowing easier removal from any cable guide fixed to the frame. A plate incorporating a cable guide, as pictured, will be easier to deal with.
3. Tips for tough tyres
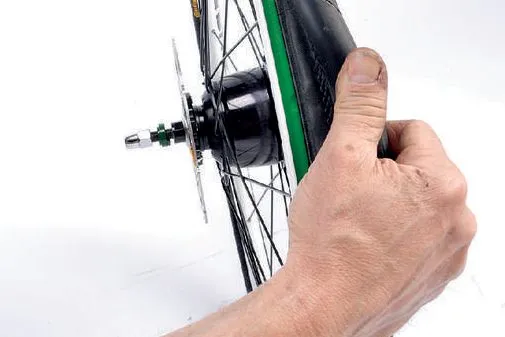
Tough commuting tyres, such as the Schwalbe Marathon, have such rigid sidewalls that removal and installation can often require a truly Herculean effort.
With a bit of manipulation, you can take advantage of the rim's smaller central circumference and gain a few extra millimetres of play to help remove the tyre. Before attempting to pry with your tyre lever and risk breaking it, squeeze any remaining air out of the inner tube.
Now manipulate the bead and move it to the middle of the rim by pinching it around its circumference as shown. You’ll gain extra slack, and might even be able to remove the tyre by hand.
4. Re-install the wheel and check gear alignment
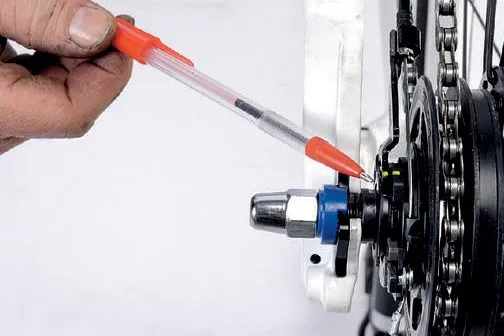
Re-install the actuator plate, then the wheel, by reversing the order of disassembly.
Make sure the gear selector is in the lowest gear and that all cable slack is pulled up. Match up the red dots on the main plate and hub, and then the large yellow lockring dots. Turn the lockring clockwise, while keeping the plate pushed against the hub, lining up the second yellow dot to lock it.
Shift up to the fourth gear. Shimano has conveniently put adjuster viewing lines on both the top and bottom of the actuator plate. The lines need to be even with each other, as pictured.
Work through the gears a few times, then re-check alignment of the yellow lines. Turn the barrel adjuster in whichever direction brings them even with each other when in fourth.
5. Adjusting the chain tension
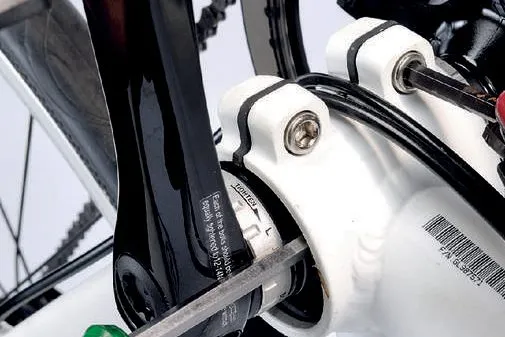
Adjusting chain tension is done either with a set of adjuster screws at the dropouts or via an eccentric bottom bracket.
For an eccentric bottom bracket, loosen the two main bottom bracket clamp bolts, then jam a screwdriver, long Allen key or other suitable tool into one of the pin openings. Rest a crank arm against this bar as pictured, and use as a lever to rotate the eccentric BB.
Adjust the chain until it is snug without being too tight (about 1-2cm deflection in the middle), keeping the bottom bracket centred in the shell. Re-tighten the clamp bolts firmly.
More advice on fixing punctures
For further advice on fixing punctures, check out our guides to how to fix a puncture (for almost all bikes with an inner tube), repairing tubeless punctures and, finally, how to pump up a tyre.

