Cyclists looking to improve riding capacity and comfort on the bike don't need to spend hours a day in the gym. Focusing on workouts that incorporate targeted, multi-joint movements will make the most of time available.
- 4 breathing exercises for cyclists
- 7 ways to get fit this year
- How to fit riding in around a busy schedule
How long do you spend in the gym? 20-minutes, 30, or even 90? For most endurance event cyclists, spending long periods of time in the gym isn’t necessary. Physiological adaptations aside, the target of endurance athletes in a resistance-training setting is ideally the nervous system.
Simply put, cyclists should focus on making sure the communication between muscle groups and the brain are firing accurately, consistently, and powerfully.
Aiming for high-quality exercises with proper form, tempo and load will result in dramatic performance changes without risk of injury.
Here are three abdominal exercises to incorporate at the end of your resistance training sessions that emphasize multi-joint neuromuscular function, improve spinal mobility and increase strength of our most beneficial abdominal muscles.
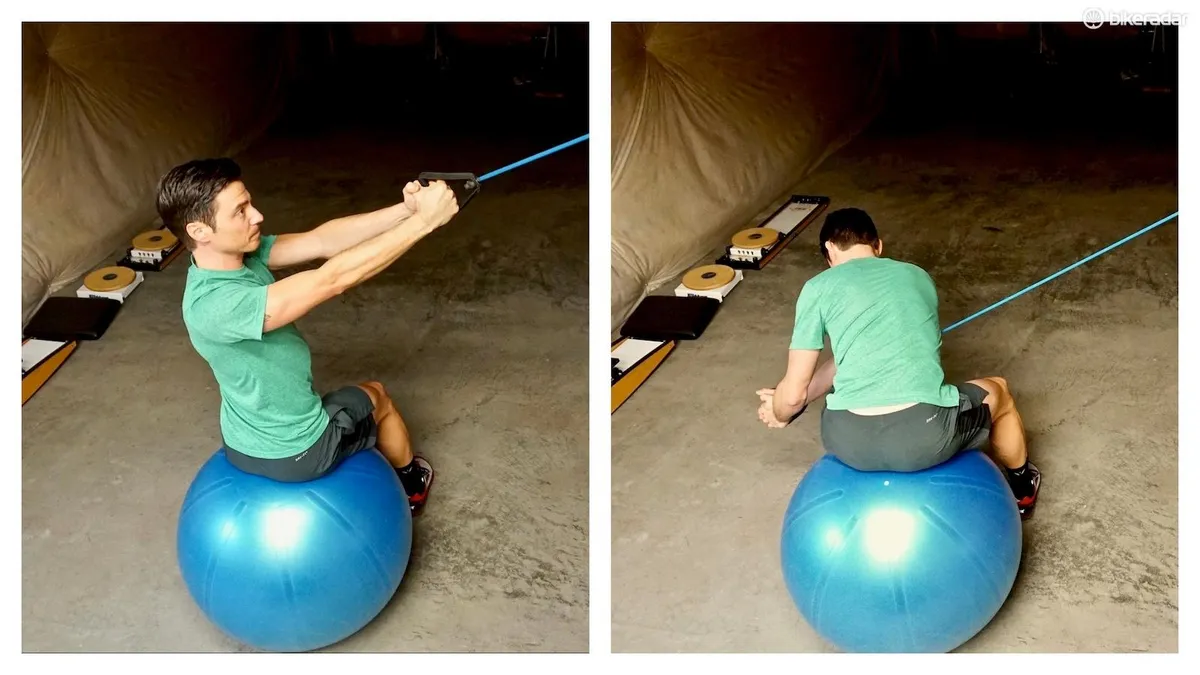
1. Seated wood chop

Adding complexity to movements in the weight room is beneficial, but also potentially dangerous. To minimize risk, the seated wood chop is one of the most powerful exercises to begin with. Its execution is quite simple and it easily promotes healthy movement habits.
Begin with feet slightly more than shoulder width apart, parallel to the location of resistance. Shoulders should be pulled back towards the spine and down to prevent a shrug.
Locking the arms requires more mobility in the spine, which is a good thing. Slightly bent elbows can alleviate joint force on the wrists, elbows, and shoulders and promote more resistance to the rotational musculature of the spine. Neither is right or wrong, but regardless of which you choose, create a static situation — don’t allow locked to go bent during the motion, and vice versa.
Rotate horizontally and bend along the length of the spine. A full rotation will bring the opposite elbow to the knee. Exhale on the downward phase, inhale on the upward phase.
Aim for 15+ reps of high-quality movement on each side. Pay attention to the side that feels stronger, and add work to your lower functioning side.
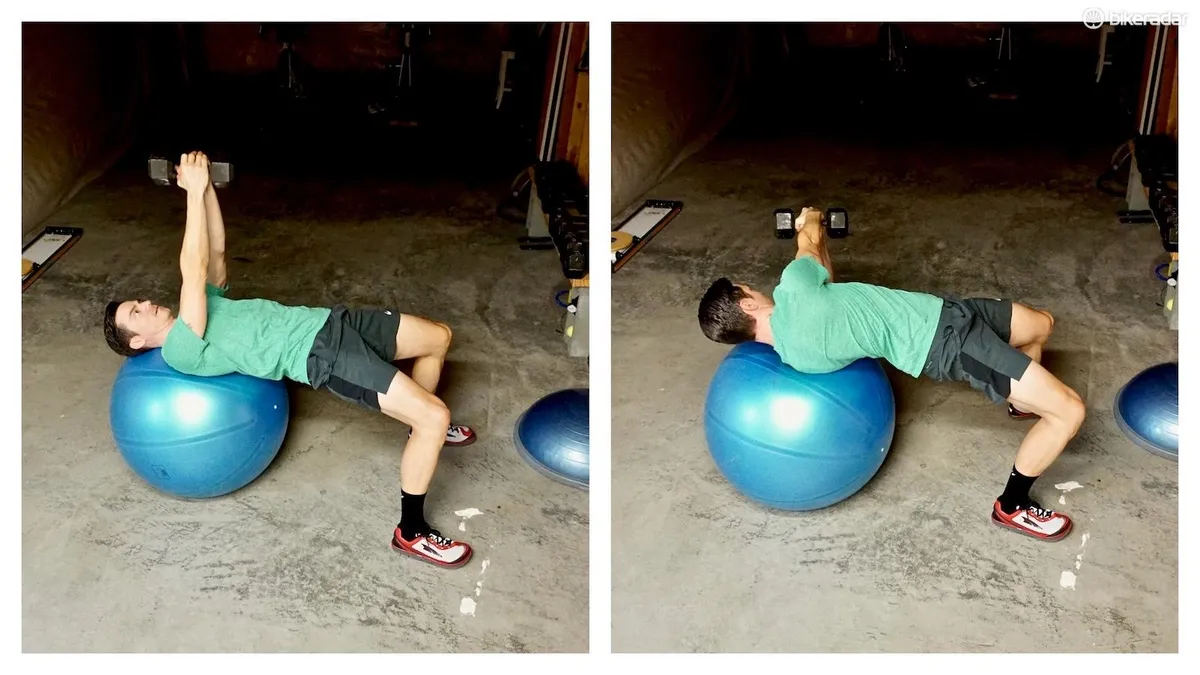
2. Supine (face-up) rotation over ball

Position yourself over a physio ball such that only your upper-thoracic spine, lower cervical spine, and shoulders are resting on the ball. Hips and lower body should be positioned to maximize glute and lower abdominal contractions and create a stable platform throughout the movement.
Starting center, rotate to each side, exhaling on the downward stroke and inhaling on the upward stroke. (This breathing technique will not be intuitive, and may even contradict methods learned previously, but this is the most beneficial method for developing optimal diaphragm function.)
Throughout the motion, maintain elevated hips and do not allow them to rotate with the spine. The most beneficial execution causes the shoulders to twist over the hips, creating a strong rotational motion along the spine.
Rotating to both sides and back to center is one repetition — aim for 15+ reps with good form and consistent breathing technique. Weight should be selected to maintain good form for all reps without resulting in outright fatigue.
If you have to hold your breath (aka a ‘valsalva maneuver’) you’ve escaped your abilities. There’s no harm in decreasing weight until the form and strength have caught up with ambition.
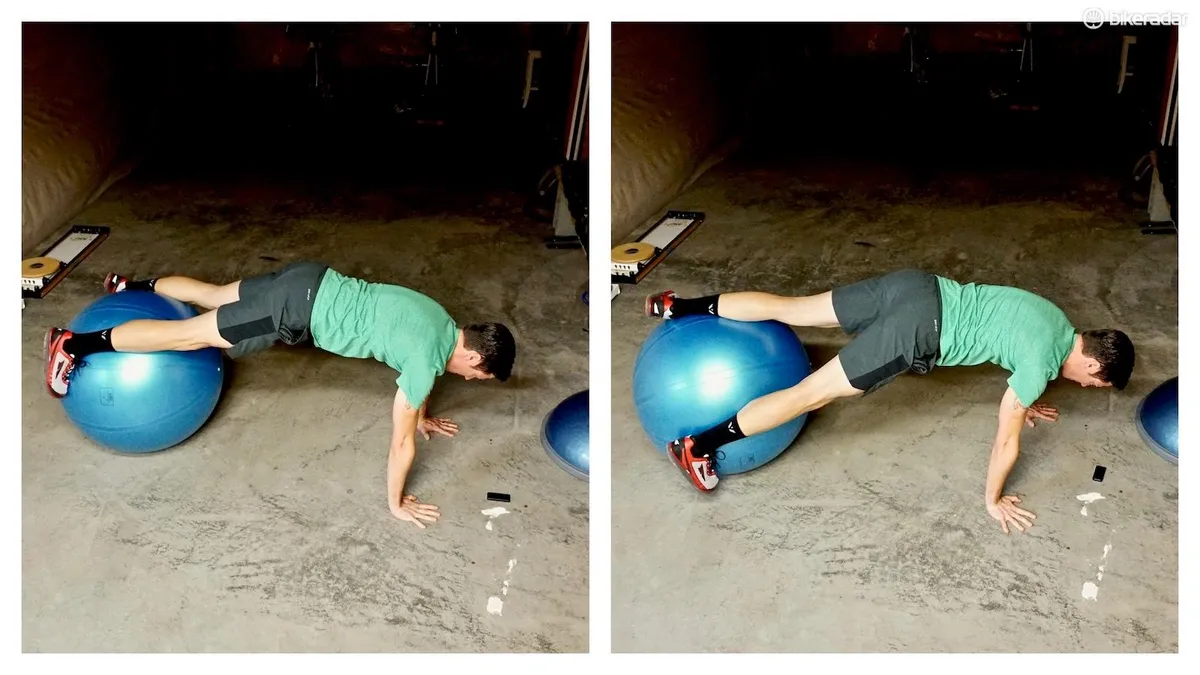
3. Prone (face-down) rotation over ball
The prone rotation over the ball is the exact opposite of the supine rotation over ball exercise not just in name but in function too.
Previously, we initiated shoulder movement over the hips. This exercise will put the shoulders in static position and require the hips and spine to be in motion.
The great part of this exercise is that the effort can be controlled in the setup. Placing the knee or lower leg on the ball decreases load, while moving out to the feet increases load.
Take note, the majority of load in this exercise will be placed directly on the low- and mid-back. If this area is problematic for you, begin with a light load to ensure proper form, and build appropriate strength.

Position yourself face-down over a physio ball. To get in to position, simply ‘walk’ your upper body until you find a push-up style plank — this is the starting position. Again, how far you ‘walk’ out is relative to your strength.
Rotate from center to one side, exhaling on the outward rotation and inhaling on the inward rotation. (Again, this breathing technique might be contradictory to your historical training methods, but research shows it is the best at creating stability in real-life exercise scenarios.)
Like the previous exercise, aim for 15+ reps with good form without resulting in outright fatigue. With neuromuscular techniques, training to failure is not advised.
Learning and perfecting these movements in the early or off-season allows you to easily execute ‘maintenance fitness’ during the season with minimal commitment. Or wait until the season is a wrap before jumping into a new resistance-training program.
Good form, proper breathing and optimal load will encourage rapid increases in neurological function, muscular strength and endurance of critical musculature.
Remember, ‘no pain, no gain’ is outdated — when finished you should feel energized and motivated.